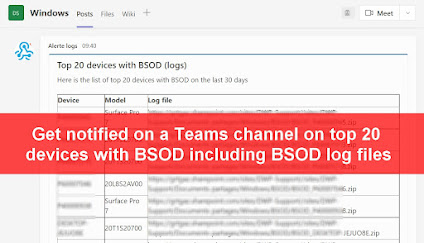
Get notified on a Teams channel on top 20 devices with BSOD including BSOD log files
In this post I will show you how to receive a list of top 20 devices with BSOD during last month including BSOD details and link to log files on a Teams channel.
Context
See below what we want:
- List top 20 devices BSOD during last month
- Get device name, model, count of BSOD, last BSOD date and code
- Get direct access to log files for troubleshooting
- Get the list with a Teams notification
The solution
We will use PowerShell, MS Graph and Azure Automation to get the list.
Check my first post, here, to know how to use MS Graph to get the list.
We will proceed as below:
1. Create a script in Azure Automation
2. It will get BSOD during last 30 days
3. Then sends the top 20 list on Teams
4. We will schedule it to run every x days
You will find there two scripts (two automation runbook):
- Runbook_without_CSV.ps1
- Runbook_with_CSV.ps1
Teams notif without CSV
In this part we will display two teams notif.
This first one will list of devices with BSOD with device name, model, BSOD count...
See below an overview:
The automation runbook to use is: Runbook_without_CSV.ps1
Teams notif with CSV
In this part we will display one teams notif.
This one allows you to open all devices with BSOD details in a CSV format from a button.
See below an overview:
The automation runbook to use is: Runbook_with_CSV.ps1
Get the script
Click on the below GitHub picture to get the script.
You will find two scripts (more info below):
- Runbook_without_CSV.ps1
- Runbook_with_CSV.ps1
Collects BSOD logs
The teams notif allows you to get access to the logs of each device with BSOD for a better troubleshooting.
For this part I use a remediation script that
1. Checks if a BSOD occurred
2. If yes collects some logs
3. Sends logs as ZIP to SharePoint
You can get this remediation script there.
Creating Teams webhook
Purpose: In this part, we will create a connector on a Teams channel allowing you to automate ability to send Teams notif.
For that, we will proceed as below:
1. Go to your channel
2. Click on the ...
3. Click on Connectors
4. Go to Incoming Webhook
5. Type a name
6. Click on Create
7. Copy the Webhook path
To configure it in the runbook, proceed as below:
1. Open Runbook_without_CSV.ps1 or Runbook_with_CSV.ps1
2. Search variable $Webhook_URL
3. Add your webhook URL
Creating the SharePoint application
We will create a SharePoint application to upload devices logs on SharePoint when BSOD occured.
This app will also be used in runbooks to check logs part for top devices with BSOD.
For that check my post here.
To configure it in the runbook proceed as below:
1. Edit PS1 file
2. Set below variables:
- $ClientID = "Your SharePoint app client ID"
- $Secret = "Your SharePoint app secret"
- $Site_URL = "Your SharePoint site URL"
- $BSOD_Folder_Location = "SharePoint folder containing BSOD log files"
How to use the script ?
See below some variables depending of the script solution you want to use.
Teams notif without CSV
The automation runbook to use is: Runbook_without_CSV.ps1
There you will need to set below variables:
Teams notif with CSV
The automation runbook to use is: Runbook_with_CSV.ps1
There you will need to set below variables:
Azure Automation account
Creating the account
1. Go to Azure
2. In the search bar type: Automation accounts
3. Go to Automation accounts
4. Click on Create
5. Type a name
6. Choose a Subscription
7. Choose the Resource group
8. Choose your region
9. Click on Create
10. Wait a bit
11. Click on Go to resource
Adding permissions
Once the Managed Identity has been configured a new Enterprise application will be created.
Then you need to add permissions to be able to actions.
The required permissions is the following:
- DeviceManagementConfiguration.Read.All
- DeviceManagementManagedDevices.Read.All
To add this permission you will need to use PowerShell, it can't be done through the portal.
For that use the script Assign_permission.ps1 on my GitHub repo.
You just need to fill below variables:
- $TenantID: your tenant ID
- $DisplayNameOfMSI: name of your automation account
Creating a Runbook
1. Go to your Automation accounts
2. Go to Runbooks
3. Click on + Create a runbook
4. Type a name
5. In Runbook type, select PowerShell
6. Click on Create
7. Choose one of the PS1 file
8 Click on Edit on the runbook
9. Copy script content
10. Click on Publish
11. Click on Yes
12. Go to your Runbook
13. Click on Schedules
14. Click on + Add a schedule
15. Click on Link a schedule to your runbook
16. Click on + Add a schedule
17. Type a name
18. In Recurrence, select Recuring
19. Select every 2 days
20. Click on Create


Enregistrer un commentaire