Run in Sandbox: a quick way to run/extract files in Windows Sandbox from a right-click on a file
In this post I will show you the new version of my solution RunInSandbox allowing you to test multiple applications in Sandbox in the same session, and test REG file.
PreRequisites
- At least Windows 10 1903
- Windows Sandbox feature enabled
The solution
It will add context menus for: PS1, MSI, EXE, Intunewin, ZIP, RAR file.
You will be able to:
- Run a PS1 as user in Sandbox
- Run a PS1 as system in Sandbox
- Run a MSI in Sandbox
- Run an MSIX in Sandbox
- Run a EXE in Sandbox
- Run a PPKG in Sandbox
- Run an Intunewin in Sandbox
- Run a REG file in Sandbox
- Open an URL or html in Sandbox
- Extract a ZIP in Sandbox
- Extract an ISO in Sandbox
- Share a folder in Sandbox
- Run multiple apps, scipts in same Sanbdox session
What's new ?
In this version you will be now able to:
- Run PS1 as user or system
- Export ISO in Sandbox
- Add a GUI to choose which context menu to add
- Context menu for PS1 works ow on Windows 11
How to get it ?
Click on the below GitHub picture
Contex menus issues
If context menus are not displayed (especially on Windows 11) or you faced some issues with a context menu action, don't hesitate to send me a mail at damien.vanrobaeys@gmail.com or add a new issue on GitHub by clicking there.
How to install it ?
1. Download the file from GitHub
2. Extract the archive
3. Run file Add_Structure.ps1 to add context menus
4. Context menus will be added for ps1, vbs, exe, zip, msi files and folder
5. A folder Run_in_Sandbox will be copied in C:\ProgramData
OR
1. Run .\Add_Structure.ps1 -NoSilent
2. A GUI will be prompted
3. Choose context menus to add
4. Click o Apply and install
Be careful
Be sure to copy all content of the ZIP including folder Sources and all its content.
Do not run only the Add_Structure.ps1 file !!!
How to remove it ?
I also added a script that delete all context menus.
For that just run the Remove_Structure.ps1 file
Sandbox configuration
1. Open downloaded folder
2. Go to Run-in-Sandbox-master\Sources\Run_in_Sandbox
3. Edit file Sandbox_Config.xml
It allows you to set below options for Windows Sandbox:
- VGpu option
- Networking option
- ReadOnlyAccess option for shared folder
- WSB files location
If the WSB_Location is set to Default, WSB files will be saved in %temp%.
You can type your own location.
It also allows you to choose which context menus you want to enable.
Set them to True or False to add context menu or not.
Choose context menu to add
1. Go to Run-in-Sandbox-master\Sources\Run_in_Sandbox
2. Edit file Sandbox_Config.xml
3. Set below nodes to True or False:
- ContextMenu_EXE: context menu for EXE file
- ContextMenu_PS1: context menu for PS1 file
- ContextMenu_MSI: context menu for MSI file
- ContextMenu_VBS: context menu for VBS file
- ContextMenu_ZIP: context menu for ZIP file
- ContextMenu_Folder: context menu for folder
- ContextMenu_Intunewin: context menu for Intunewin file
Run PS1 as user in Sandbox
1. Choose the PS1 you want to run in Sandbox
2. Do a right-click on the PS1 file
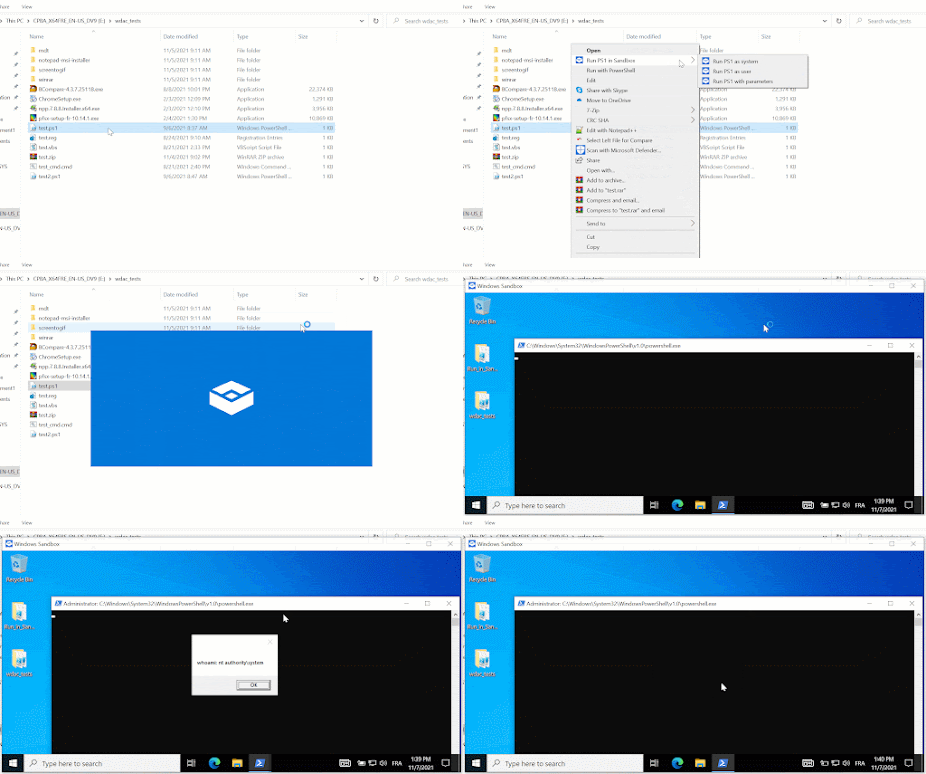
3. Select Run PS1 in Sandbox > Run PS1 as user
4. A Sandbox config file will be generated on your desktop using the file name
5. The Sandbox will be automatically launched with the specific configuration
In the below example I run a PS1 that will display the current user name in a msgbox:
Run PS1 as system in Sandbox
1. Choose the PS1 you want to run
2. Do a right-click on the file
3. Select Run PS1 in Sandbox > Run PS1 as system
4. A Sandbox config file will be generated on your desktop using the file name
5. The Sandbox will be automatically launched with the specific configuration
In the below example I run a PS1 that will display the current user name in a msgbox:
Run PS1 silent install in Sandbox
1. Choose the PS1 you want to run
2. Do a right-click on the PS1 file
3. Select Run PS1 in Sandbox > Run PS1 with parameters
4. A GUI will be displayed
5. Type parameters to add to the commandline
6. The Sandbox will be automatically launched with the specific configuration
7. The appropriate WSB is created in %temp%
Run EXE in Sandbox
1. Choose the EXE you want to run
2. Do a right-click on the EXE file
3. Select Run EXE in Sandbox
4. A GUI will be displayed
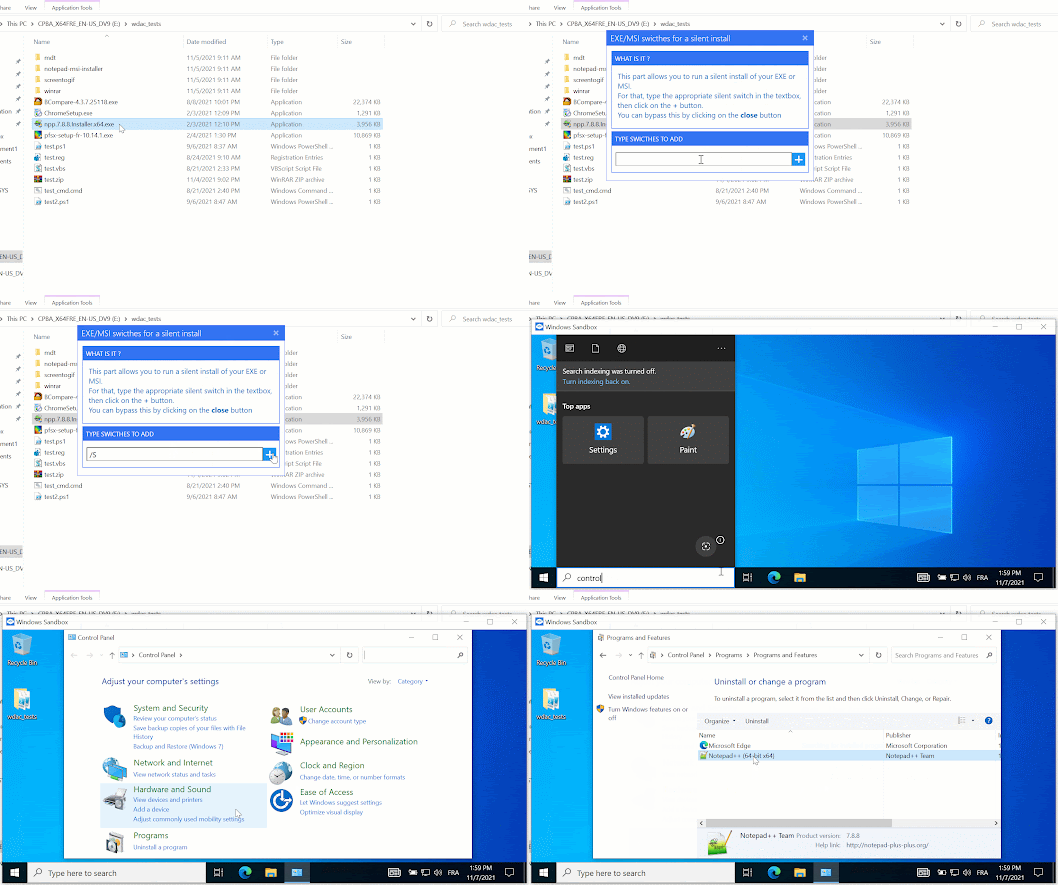
5. Type switches to add to the commandline or skip it
6. The Sandbox will be automatically launched with the specific configuration
7. The appropriate WSB is created in %temp%
In the below example I run Notepad++ exe without silent switche:
In the below example I run Notepad++ exe with silent switche:
Run MSI in Sandbox
1. Choose the msi you want to run in Sandbox
2. Do a right-click on the msi file
3. Select Run msi in Sandbox
4. A GUI will be displayed
5. Type switches to add to the commandline
6. The Sandbox will be automatically launched with the specific configuration
7. The appropriate WSB is created in %temp%
In the below example I run WinRAR msi without silent switche:
In the below example I run WinRAR msi with silent switche:
Run VBS in Sandbox
1. Choose the VBS you want to run in Sandbox
2. Do a right-click on the VBS file
3. Select Run the VBS in Sandbox
4. The Sandbox will be automatically launched with the specific configuration
5. The appropriate WSB is created in %temp%
In the below example I run a VBS that displays a msgbox toto:
Run VBS silent install in Sandbox
1. Choose the VBS you want to run in Sandbox
2. Do a right-click on the VBS file
3. Select Run VBS in Sandbox with parameters
4. A GUI will be displayed
5. Type parameters to add to the commandline
5. The Sandbox will be automatically launched with the specific configuration
7. The appropriate WSB is created in %temp%
Extract ZIP in Sandbox
1. Do a right-click on the ZIP file
2. Click on Extract ZIP in a Sandbox
3. The Sandbox will be launched and the ZIP file will be eextracted on the desktop
4. The appropriate WSB is created in %temp%
In the below example I extract ZIP contaning a VBS file:
Share folder in Sandbox
1. Do a right-click on or in the folder
2. Click on Share this folder in a Sandbox
3. The Sandbox will be launched and the folder will be shared
4. The appropriate WSB is created in %temp%
Test multiple apps
In order to be able to test multiple apps or files in the same Windows Sandbox session,
We will proceed as below:
1. Create a file with extension .sdbapp called App_Bundle.sdbapp
2. This file will work as an XML file.
3. Add a new node for each app you want to install.
4. The node looks like as below:
As you may noticed, to add a new application you have to add:
- Application name
- Application path (on the host)
- Application silent switch
See below an overview of installation of multiple applications:
Here is an example with some applications: MDT, Notepad++, Photofiltre, a PS1 file:
Run a REG file in Sandbox
1. Do a right-click on a REG file
2. A context menu will be available
3. Click on Test reg file in Sandbox
4. Windows Sandbox will be opened with the reg execution
5. The appropriate WSB is created in %temp%
Run a PPKG file in Sandbox
1. Do a right-click on a PPKG file
2. A context menu will be available
3. Click on Run PPKG file in Sandbox
4. Windows Sandbox will be opened with the reg execution
5. The appropriate WSB is created in %temp%
In the below example, I will run a PPKG that enrolls my Sandbox into Azure AD/Intune
Extract an ISO in Sandbox
1. Do a right-click on a REG file
2. A context menu will be available
3. Click on Test reg file in Sandbox
4. Windows Sandbox will be opened with the reg execution
5. The appropriate WSB is created in %temp%
In the below example I extract a Windows 11 ISO:
Run an MSIX file in Sandbox
1. Do a right-click on a MSIX file
2. A context menu will be available
3. Click on Run MSIX file in Sandbox
4. Windows Sandbox will be opened
5. Go to Apps & Features
6. You will see the application
Open an URL in Sandbox
1. Do a right-click on an HTML file or an URL file
2. A context menu will be available
3. Click on Run web link in Sandbox
4. Windows Sandbox will be opened
5. The URL will be opened in Edge
In the below example, I will run an MSIX that installs 7zip:


Enregistrer un commentaire