
Exporting custom Intune report to a CSV on SharePoint with Logic Apps

In this post I will show you how to use Logic Apps to export Intune report to a CSV on SharePoint every days. in order to create Power BI dashboard for instance.
Context
On Intune you can export a lost of things to a CSV file.
You can for instance export Intune discovered apps, as below:

You can find on this post a way to do this with a Logic App.
You can also export info about update, defender agents, active malware...

Exporting report to a CSV can be helpful to send to someone else or to create Power BI dashboard with a CSV.
You can export a report through the portal meaning you can of course do this using MS Graph.
Actually when you click on the export button, it will run a exportjob action in background with the following URL and a POST method.
To do this with Graph, you will need to specify the name of the report to export and columns to display in a body.
You can find there name of report to specify and where you can get them through the portal.

The solution
The idea is to have a script or a Logic app that will export data from the report as CSV.
In my previous post I explained of the export discovered apps. For that I specified the name of the report in a body and HTTP request.
To export whatever Intune report we want we will proceed as below:
1. Specify the name of the report we want in a variable
1. Run the exportjob action on the specified report
2. The action will return a status
3. When the export action is finished status is Completed
4. Then it will return an URL
5. With this URL you will be able to download a ZIP
6. The ZIP will contain the CSV
Requirements
SharePoint service account
We want to export Intune discovered apps on SharePoint every days so we will need an account to create the file.
I recommend you to use a service account. You can also use your own account of course.
Azure Application or managed identity
The first step is to create an Azure Application.
This one will be used to authenticate and execute MS Graph query.
Click here to see how to proceed.
Creating the Logic App
Click here to see how to proceed.
Logic App step by step
Step 1: Recurrence
This step allows you to schedule the execution of the Logic App.
1. Go to Logic App Designer
2. Click on recurrence
3. Choose your schedule
Step 2: Initialize report variable
In this step we will specify which report we want to export.
For that we will create a new variable containing the report name.
In this example we will play with ActiveMalware report.
We will proceed as below:
1. Click on New step
2. Choose Initialize variable
It's a component of Variables
3. In Name, type ReportName
4. In Type, choose String
5. In Value, type ActiveMalware
Step 2, 3 - Remove existing CSV
Using this Logic App we will create a new CSV on a SharePoint.
There we will first remove the created CSV file if exist.
We will proceed as below:
1. Click on + then Add an action
2. Choose Get files (property only)

It's a SharePoint action
3. Click on Sign in

4. Type credentials of the account that can create file on SharePoint
5. In site address, choose your site

6. In Library name, choose Documents
7. Click on Add new Parameter

8. Check Filter query

9. Go to Filter query
10. Type FileLeafRef eq '@{variables('ReportName')}.csv'
Now we will add a condition to check if the file already exists.
If yes we will remove it.
1. Click on New step
2. Choose Condition
It's a Control action

3. Go to Choose a value

4. Go to Expression

5. Type: length(body('Get_files_(properties_only)')?['value'])
6. Select is greater than

7. Then type 0

6. Go to True
7. Click on Add an action

8. Choose Delete file
It's a SharePoint action

9. In site address, choose your site
10. Go to File identifier
11. Go to Dynamic content, choose Identifier


Step 4 - Export report job
This step allows you to use MS Graph to query Intune in order to initialize the export job action.
This will run an exportjob action and you will get the URL of the ZIP to download.
We will proceed as below:
1. Click on New step
2. Choose HTTP

3. In Method select POST
4. In URI type the below one:
https://graph.microsoft.com/beta/deviceManagement/reports/exportJobs

5. In Body, type the following JSON:
6. Clic on Add new parameter
7. Check Authentication

8. Select Active Directory OAuth
9. In TenantID, type your tenant id
10. In Audience, type https://graph.microsoft.com
11. In Client ID, type the client id of the azure app
12. In Credential type, choose Secret
13. In Secret, type the secret of the azure app

14. Save the app
15. Click on Run trigger > Run
16. Go to the Body part
17. Copy content
We will use the body content in the Parse JSON part (just below).
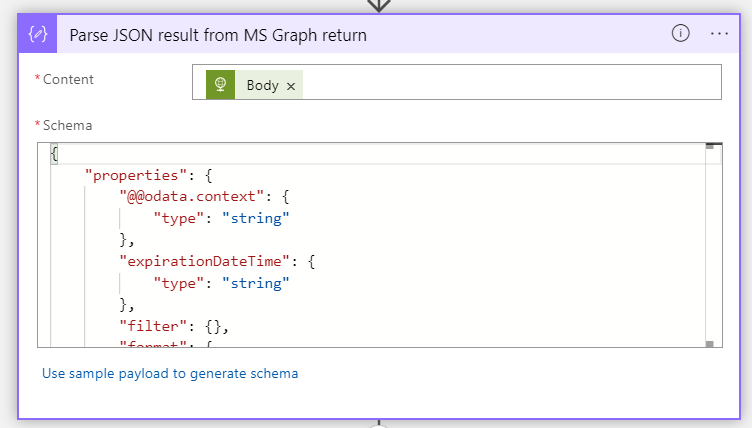
Step 5 - Parse JSON content
This step allows you to use MS Graph to query Intune and get information provided by the previous MS Graph query.
Info is received through the previous HTTP action.
We need to parse content of the received information using a Parse JSON action.
We need to configure the schema with provided by the previous HTTP step.
For that we need to first run the trigger and get Body result from the HTTP action.
This is what we have done in the part 18 from the previous step.
See below how to proceed:
1. Click on + then Add an action
2. Choose Parse JSON
It's a component of Data operations

3. Click on Content
4. Go to Dynamic content and type Body
5. Select Body
6. Click on Use sample payload to generate schema
7. Paste JSON content copied from Step 2 part
Step 6 - Initialize appid variable
In this step we will get the application id provided by the previous Graph query and the Parse JSON step.
We will proceed as below:
1. Click on + then Add an action
2. Choose Initialize variable
3. Type appid
4. Go to Value
5. Choose ID (from the Parse JSON)

Step 7 - Initialize Status variable
Here we will initialize a variable to get the application id of the Graph query.
1. Click on + then Add an action
2. Choose Initialize variable
3. In Name, type AppStatus
4. In Type, choose String

Step 8 - Get status of the export
This step allows you to use MS Graph to query the previous export action.
Here we want to know if the action is finished or not.
If finish status will be completed.
Do add it proceed as below:
1. Click on + then Add an action
2. Choose HTTP
3. In Method select GET
4. In URI type the below one:
https://graph.microsoft.com/beta/deviceManagement/reports/exportJobs('@{variables('appid')}')
5. Clic on Add new parameter
6. Check Authentication
7. Select Active Directory OAuth
8. In TenantID, type your tenant id
9. In Audience, type https://graph.microsoft.com
10. In Client ID, type the client id of the azure app
11. In Credential type, choose Secret
12. In Secret, type the secret of the azure app
13. Save the app
14. Click on Run trigger > Run
15. Go to the Body part
16. Copy content
Step 9 - Parse JSON content
This step allows you to use MS Graph to query Intune and get information provided by the previous MS Graph query.
Info is received through the previous HTTP action.
We need to parse content of the received information using a Parse JSON action.
We need to configure the schema with provided by the previous HTTP step.
For that we need to first run the trigger and get Body result from the HTTP action.
This is what we have done in the part 18 from the previous step.
See below how to proceed:
1. Click on + then Add an action
2. Choose Parse JSON
It's a component of Data operations
3. Click on Content
4. Go to Dynamic content and type Body
5. Select Body
6. Click on Use sample payload to generate schema
7. Paste JSON content copied from Step 2 part


Step 12 - Set variable JobURL
In this we we will store the job URL in the JobURL variable.
The job URL is provided by the previous Parse JSON as url.
We will proceed as below:
1. Click on + then Add an action
2. Choose Initialize variable
3. Type JobURL
4. Go to Value
5. Choose url (from the Parse JSON)
Step 13 - HTTP query on the JobURL
This step allows you to use MS Graph to query job URL we get from the previous action.
With the body content we will be able to create a file in a new step.
Do add it proceed as below:
1. Click on + then Add an action
2. Choose HTTP
3. In Method select GET
4. In URI type JobURL from the previous action
Step 14 - Create ZIP file
1. Click on + then Add an action
2. Type Create file
3. Choose Create file
It's a component of SharePoint
4. In site address, choose your site
5. In Folder path, type the path of your folder
In my case it's: /Documents partages/Windows/Logs
6. In File name, type @{variables('ReportName')}.zip
7. Click in File content
8. Choose Body from the previous HTTP step

Step 15 - Extract ZIP file
1. Click on + then Add an action
2. Choose Extract folder
It's a SharePoint action
3. In site address, choose your site
4. Go to Source File path
5. Type the SharePoint folder where to save the file
In my case it's: /Documents partages/Windows/Logs/
6. Go to the end of the path then Dynamic content
7. Choose ReportName variable

8. Then type .zip, it should be as below:

9. Go to Destination Folder Path
10. Type the folder where the ZIP is
In my case it's: /Documents partages/Windows/Logs
11. In Overwrite Flag, select yes

Step 16 - Filter array
When you export your report from Intune, it will be downloaded as a CSV file with name.
When you do this with Graph the export job will download a ZIP file and the ZIP will extract a CSV with name YourReport_***.csv
Here we want to filter result of the previous Extract folder action on the name of the CSV.
We have already set the name of the CSV by specifying the variable ReportName.
We will proceed as below:
1. Click on + then Add an action
2. Type Filter
3. Choose Filter array
It's a Data operations action
4. Go to From
5. Select Body from the Extract_Folder action
6. Go to value
7. Choose Path
8. Select Contains
9. Then go to Dynamic content
10. Choose variable ReportName

Step 17 - Get file metadata
1. Click on + then Add an action
2. Choose Get file metadata using path
It's a SharePoint action
3. In site address, choose your site
4. Go to File path

Step 18 - Get file properties
1. Click on + then Add an action
2. Choose Get file properties
It's a SharePoint action
3. In Library name select Documents
4. In Id, select ItemId

Step 19 - Send HTTP request to SharePoint
By default when you export a report from Intune, it will create a CSV with name of the report then the appid.
Here in our example we wan to export ActiveMalware report. The name of the CSV will be something like: ActiveMalware_7219da44-96af-4ceb-af9e-17074863a8dd.
Here we want to rename the CSV to have something better like ActiveMalware.csv
We will proceed as below:
1. Click on + then Add an action
2. Choose Send HTTP request to SharePoint
It's a SharePoint action
3. In site address, choose your site
4. Choose POST as Method
5. in Uri, type the below one:
_api/web/lists/getbytitle('Documents')/items(@{body('Get_file_properties')?['ID']})/validateUpdateListItem
6. In Body, type the below one:

Step 20 - Delete the ZIP
Here we want to delete the ZIP generated in the step 16.
We will proceed as below:
1. Click on + then Add an action
2. Choose Delete file
It's a SharePoint action
3. In site address, choose your site
4. Go to File identifier
5. Type the path of DiscoveredApps.zip


Enregistrer un commentaire