
SelfX admin: a tool allowing users to solve issues (requiring admin rights) themselves and reduce tickets/calls to your support team

Context
- There are a lot of tickets/calls to support
- Elevated rights may be required to solve them
- You want to avoid call to support
- You want users can solve issue themselves
- You want to add yourself a list of issues
Advantages
Reduce support tickets/calls number
The idea of the tool is that when a user has an issue on his device, he will first run the tool to check if something corresponds to his issue.
If yes he just has to click on a button to solve the issue by himself without calling support team.
User will be able to solve issue that event if they require admin rights to be solved.
The goal is to solve/avoid all tickets/call to support when it's possible.
Easy to update/manage
All issues in the tool are displayed through an XML file.
This way, you can really easily add a new issue in the tool by adding a new file.
Indeed the idea is that I provide the main tool with some issues ideas and then you add your own issues depending of your IT infrastructure.
Multilanguage
Everything (really everything) in the tool can be managed through an XML file.
You can then customize issues list, title, text in buttons...
It's now up to you to change it to your own language.
Issues list location
All issues are location in an XML file.
This XML is by default located locally.
It's also possible to use it from the Web, like blob storage.
Easy to use
The tool is really easy to use for a user.
He just has to scroll down the list of action and search if he finds something relative to his issue.
A search bar also allows him to filter on issues.
User right version
You can find there another version allowing users to solve issues that don't required admin rights.
The solution
What is the goal ?
The idea of the tool is, as may know, you can automate a lot of things.
When a user has an issue you solve it manually, however it can be done through PowerShell.
For instance let's take some examples:
- User has sync issue with OneDrive
- You have file locked on OneDrive
- Device is running slow
- You want to restart a specific service
- Many more...
All those issues can be solved with PowerShell.
Elevated rights ?
As mentioned previously this tool allows user to solve issues requiring admin rights.
Don't worry the idea is not to provide admin rights to user or credentials.
The solution is really simply, we will just run the tool in system context through the Company Portal or Software Center (for MECM).
This way the tool will be opened as system, meaning elevated rights and each action through the tool will be executed with admin rights.
The tool won't open any cmd prompt, explorer window... so don't worry people couldn't use it in bad ways.
The user GUI
The solution is to provide a GUI to user displaying different lines.

Each line corresponds to a specific issue.
All issues are organized in different categories like OneDrive, Teams, Outlook, Device...

Each line contains two buttons:
- Run an action
- Show an explanation
If the user clicks on the first button, a script is executed in background to solve the issue.

You can add as many actions or categories you want in the tool.
Indeed everything is managed just with an XML file: actions list, title, subtitle...
Note: I provided a list of actions in the XML but the idea is you add your own issues in the XML. Indeed issues depend of your context, for instance we don't have the same VPN client, office version...
How does it work ?
1. Go to the company portal or Software Center
2. Launch SelfX admin tool

3. A GUI will be displayed
4. The GUI will load content from XML

5. Select the issue
6. Click on the solve issue button
The SelfX tool won't be installed on your device.
We will set a fake detection rule for the Win32 app or MECM application.
This way the user will be able to run the tool whenever he wants (we will see the GUI in details later).
Adding issues
As mentioned before, the GUI displays a list of issues.
All issues are provided through an XML file, nothing to do in the PS1 or XAML.
Note: I provided a list list of actions in the XML but the idea is you add your own issues in the XML. Indeed issues depend of your context, for instance we don't have the same VPN client, office version...
Adding a new action in the list can be achieved in 2 steps:
- Add new node in the XML
- Copy PS1 in the Script_to_run folder
XML node is composed as below:
- Name: text displayed in the list
- Explanation: warning after clicking on the 2nd button
- Script: file executed after clicking on the 1st button
- Category: category of the action
- Alerte_MSG: warning after clicking on the 1st button
In the below example I want to add an action allowing user to restart Intune service.
For this, I will:
- Add new category called device
- Display action: Force synchronization to Intune
See below the appropriate node:
Then we will need to add our script in the Scripts_to_run folder.
When you run again the shortcut, you will see the new action as below:
There are two ways to get list of issues in the tool:
- Locally
- From the web (like blob storage)
Locally
In this case proceed as below:
1. Edit the Issues_List.xml file
2. Go to XML_Version
3. Type your XML version (depending of your change)
4. Add your issues
5. Copy script in Scripts_to_run folder
6. Create or update the Win32 app
If you choose this method, when you want to add new issues you will need to update the Win32 app meaning intunewin file.
From the web
In this case proceed as below:
1. Edit the Issues_List.xml file
2. Go to XML_Version
3. Type your XML version (depending of your change)
4. Add your issues
5. Copy script in Scripts_to_run folder
6. ZIP content of Scripts_to_run folder
7. Upload the ZIP somewhere (for me a blob storage)
8. Get path of the ZIP from the web
9. In Link_Scripts copy this path
If you use this way, each time the user will run SelfX, it will first get XML from the web and check if this is the latest version.
How it looks like ?
The GUI looks like as below:
For each category an expander is created, as below:

Each nodes in the XML is displayed in the appropriate category, as below:

Each line contains two buttons as below:
A legend at the top explains what does each button:

When user clicks on the run button a warning is displayed, as below:

When user clicks on the run explanation a warning is displayed, as below:

A search button at the top, in the title bar allows you to filter on issues.
After clicking on it, the below window will be displayed
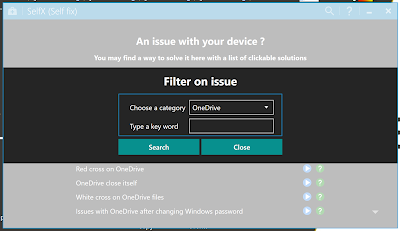
Choose the category of the issue, then type a key word.
Changing language


How to get it ?
Click on the below GitHub picture to dowload the tool

Implement with Intune
Creating/Updating the package
1. Update Issues_List.xml with your issues
2. Add scripts in the Scripts_to_run folder
3. Download the tool here
4. Run Intunewin Create and Extract
5. Go to Build tab
6. Go to Package sources part
7. Click on Browse
8. Select the folder containing your application
9. Go to Application name
10. Select Run_SelfX.ps1
11. Go to Location part
12. Click on the Browse button
13. Select the folder where to save the intunewin package
14. Click on Build the intunewin package
15. Create a new Win32 app in Intune
16. Integrate the new intunewin created
Integrating in Intune
1. Go to Intune
2. Go to Client apps
3. Go to Apps
4. Click on Add
5. Select Windows app (Win32)
6. Browse to the intunewin
7. Click on OK
8. Click on App information > Configure
9. Type informations, as below:
10. Click on OK
11. Click on Program > Configure
12. In Install command type this:
13. In Uninstall command type the same
14. Select System
15. Click on OK
16. Click on Requirements > Configure
17. Type your requirements
18. Click on OK
19. Click on Detection rules > Configure
20. Select File detection
21. Choose a fake detection method
22. There it's C:\Windows\toto\toto.txt

23. Click on Next
24. Click on OK twice
25. Click on Add
Assign the app
1. Go to Assignments
2. Click on Add group
3. Assign as you want
Feedback needed
If you have implemented SelfX to your company, all feedback are welcome.
I'm really interested to see if your tickets number have been reduced since the implementation.
For that send me a mail at damien.vanrobaeys@gmail.com or a tweet to @Self__x


2 commentaires
Just a couple of questions on this. On the install command, you forgot to enter what the install command is.
Also what is the difference between Selfx Standard and Selfx Admin?
Does this script create the toto.txt file?
Hello, I would like to learn the uninstall command for this.
Enregistrer un commentaire