
Intune reporting with Log Analytics: analyze disk size to see what's taking up place

In this post I will show you a report of devices with low disk space allowing you to understand what takes place and resolve it.
The solution
This will resume
in few steps:
- Creating a
Proactive Remediation sript
- This script
will be executed on your devices
- It will check
some information
- It will send
info to Log Analytics
Get the files
Click on the
below GitHub picture to get required below files:
-
LA_DiskSize_workbook.json
- Detection_script.ps1

How it looks like
?
The Log Analytics
will display below information:
- Disk full size,
free space, free space percent, OneDrive size on disk...
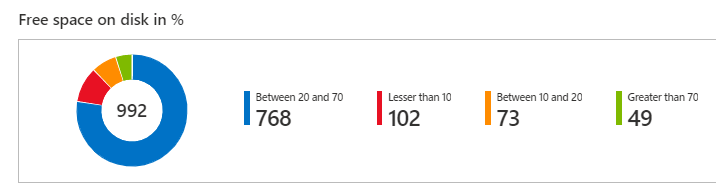
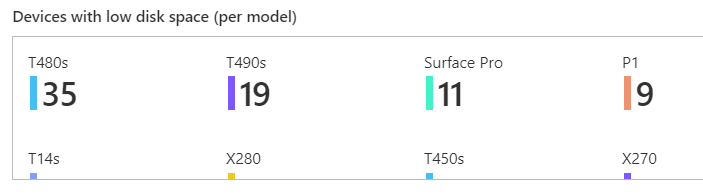
- Devices with low disk space (per model)
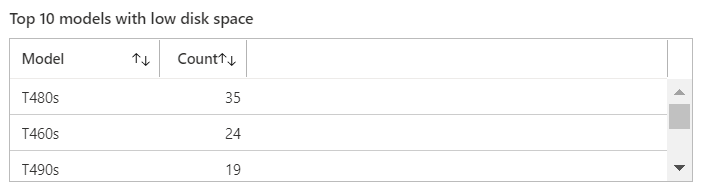
- Top 10 models with low disk space
- Top 10 devices with low disk space
- Devices with
Always keep on device checked at OneDrive root
- Larger folders in current user profile for devices with less than 20% free space
- Larger folders in C:\Users for devices with less than 20% free space
- Larger folders in C:\ for devices with less than 20% free space
The workbook is divided in 3 tabs:
- Disk size resume
- OneDrive usage
- View larger content on disk
See below an overview:


See below details.
Disk size resume tab
Device free space percent
You can find a pie chart with number of devices per free space %.

Device size details
The following grid will display different information relative to disk space on devices:
- Computer name
- Free space %
- OneDrive size on disk %
- Disk size
- Disk freespace
- OneDrive size
- OneDrive size on disk
- Desktop size
- Desktop size on disk
- Documents size
- Documents size on disk
- Pictures size
- Pictures size on disk

OneDrive usage tab
OneDrive size on disk percent
You can find a pie chart with number of devices per OneDrive size on disk %.

Always keep on
device option
This option is a
OneDrive option that you can enabled on a folder or at OneDrive root.
If you enable it
at OneDrive root all your documents will be stored locally too.
It means it can
have a huge impact on disk size.
The following
chart will check how many devices have this option enabled at OneDrive root.
See below an overview:

Then the workbook
displays list of devices that have this option enabled:

Now we have information about disk size, the next step is to know what take more space on disk.
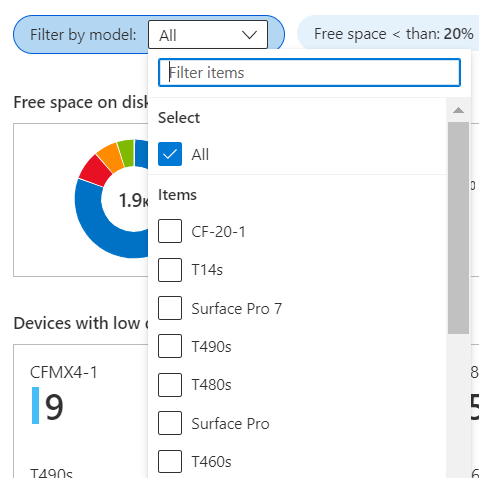
The next grids
allows you to display larger content on devices that have less than 20% of free
disk space.
Larger folders in
current user profile

Larger folders in C:

Larger folders in C:\Users


Log Analytics
information
In order to
create this report we will need some information relative to the Log Analytics
workspace.
See below
required info:
- Workspace ID
- Primary key
- Name of the
custom log to create or update
To get those
information go to Log Analytics Workspace > Agents management
You will find
both Workspace ID and Primary key.
Then we will
proceed as below:
1. Open the file
Detection_script.ps1
2. Fill below
variables:
- $CustomerID:
workspace ID
- $ShareKey:
Primary key
Creating the
Proactive Remediation package
1. Go to the
Microsoft Endpoint Manager admin center
2. Go to Reports
3. Go to Endpoint
Analytics
4. Go to
Proactive Remediations
5. Click on
Create script package
6. Type a name
7. Click on Next
8. Click on
Detection script file
9. Browse the
script Detection_script.ps1
10. Click on Next
11. Select the
group
12. In the
Schedule part, choose when the package should be run.
13. Click on
Apply
14. Click on Next
15. Click on
Create
Adding the
workbook
In this part we
will add the report.
The report can be
downloaded on GitHub, lin mentioned above.
The report is the
file: DiskSize_Workbook.json
To add it,
proceed as below:
1. Go to the
Azure portal
2. Go to Log
Analytics workspace
3. Go to workbook
4. Click on New
5. Go to Advanced
editor, at the top

6. Remove content
7. Go to the GitHub link, there8. Click on the copy button as below
9. Click on Apply

10. Click on Done editing then Save


4 commentaires
Would this work with other disks then C: if I run it on servers?
Hello
thx for the nice post
I have 2 failed users in the "device status" section.
What does it mean ?
Very nice script and workbook!
The columns HardDiskSizeMb_d and DesktopSizeOnDiskMb_d are missing on the DiskSize_CL table.
Tried adding the columns but I'm unable to save the changes (the Save button is greyed out). I see the suggestion to update to DCR-based custom logs, but it could be too much work to get these two columns.
The reports work if I edit the JSON to remove those columns; if anyone has a solution to this, I'll appreciate it.
Thank you!
Hi Damien,
Thank you for this Solution, just testet it out. It works great.
Maybe you can help me with my question. In the Report, the Size of the Recycle Bin shows me very large numbers, i.e. 1.995PiB and 61,143TiB. Why is that? Did i do something wrong ?
regards
Kudi
Enregistrer un commentaire